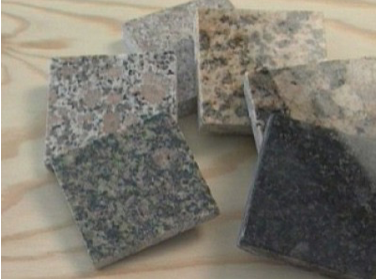
1. Granite Processing
The majority of granite countertops are made from raw slabs that require a considerable amount of expertise, labor, and time in their fabrication. This process creates excessive scrap material during the handling, cutting, and processing of the slab; this is why granite countertops cut from raw slabs are extremely costly to consumers. This process does allow for the exact choice and placement of grain, etc in the granite, as well as custom edges for each application; however this option can cost in the tens of thousands of dollars. With the introduction of Pre-fabricated granite countertops, all this changes. To avoid most of the disadvantages of using raw slabs, our counters are pre-cut and made to standard sizes with standard round bullnose edging for easy installation; offering the same great looks and durability at a fraction of the cost. Pre-fabricated granite countertops come in standard colors & sizes all with a round bullnose edge allowing for a typical application at prices competitive to laminate or tile.
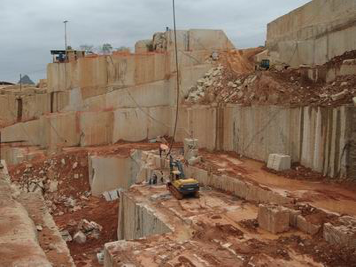


Raw granite boulders are purchased from around the world and shipped to our facility in China for processing. Bridge saws are used to cut the boulders into granite slabs.
2. About Granite
Granite
Granite begins as a hot, 1400-degree Fahrenheit, mass of magma or molten rock. The magma rises upward and comes to rest and solidified into granite. The granite has been pushed upward, and the land above it has been removed by erosion. The result is a granite deposit that lies just beneath the earth’s surface where it can be easily quarried. Granite is one of the hardest rocks.
Marble
Marble is simply a limestone that has been compressed or heated deep within the earth’s crust. Unlike granite, marble was never molten rock, but it may have been heated and squeezed enough for the limestone grains to bend and flow. Marble is a relatively soft mineral. Because marble is made entirely of calcite, it is much softer than granite.
The advantages of choosing Granite:
- Incredibly durable; it provides a carefree surface that is easily maintained.
- Heat resistant; you can set hot pots directly on Granite.
- Highly resistant to common household stains. If sealed properly and regularly, Granite is impervious to stains.
- Immune to freezing, thawing, mold, and mildew.
- Granite is over 150 times more bacteria resistant than plastic laminate, concrete, tile, or wood. The Hospitality Institute of Technology & Management shows granite is second only to stainless steel in cleanliness.
- Will not scratch with normal use. Granite is the second hardest material on earth (second only to diamonds), making it scratch resistant.
- Sealing of Granite is as simple as wiping down your counters and only needs to be done once a year.
- Granite saves money. You don’t have to buy cheap laminate countertops every 10 or so years.
- The fact that other solid surfaces attempt to make their products look like Granite speaks volumes about which product is the most beautiful.
- Naturally beautiful even after 50 years. Granite provides beauty and elegance that will be appreciated for a lifetime. Since each piece of granite is different in color, your countertops will be unique and distinctive.
- Granite adds value to your home.
- Granite is a natural material.
3. Countertop Comparison
Laminate (Formica)
Made of synthetic material. A thin layer of plastic that is glued to particle board or wood.
Advantages
- Low Cost
- Numerous Colors
- Easy Upkeep
Disadvantages
- Scratches Easily
- Not heat resistant
- Warping occurs from prolonged exposure to water
- Hard to be repaired once chipped
Acrylic or Polyester Plastic (Corian etc.)
Unlike laminates, Acrylic and Polyester plastics are homogenous throughout the material. They come in polished or matte finish. Often more expensive than granite.
Advantages
- Stain Resistant
- Seamless
- Many Colors
- Easy to clean
Disadvantages
- Scratches Easily
- Hot object will melt surface
- Cost
- Unnatural appearance
- Synthetic Material
Tile
Tile Countertops come in a wide variety of sizes from 1″ to 24″. Average handy homeowner can install this.
Advantages
- Stain Resistant
- Heat Resistant
- Scratch Resistant
- Many Patterns & Designs
Disadvantages
- Not a smooth surface
- Chips easily
- Tiles have grout lines that must be cleaned regularly so they do not stain or trap harmful bacteria
Concrete
Made of cement, sand, pigment and other additives such as fiber enforcement and acrylic. The countertops can be pre-cast to fit a mold or cast on site.
Advantages
- Textured look
- Heat Resistant
- Easy to be shaped
Disadvantages
- Must be sealed properly to resist stains & water damage
- Needs occasional waxing to prevent stains
- Cutting on Concrete will leave marks
Engineered Stone (Zodiac, Quartz, Silestone, etc.)
Made of natural quartz, sands, epoxy resin and pigments. Product tries to simulate Granite, marble or travertine.
Advantages
- Wide variety of Colors
- Scratch Resistant
- Uniform Pattern
Disadvantages
- Very controversial hazardous toxins thought to be emitted during fabrication and cutting
- Tolerates moderate temperatures only for brief periods
- Costs more than Granite
Granite
Made entirely of natural materials, mass of magma or molten rock. Granite is the most durable, chip & scratch resistant material. Easy to clean & maintain. No other material lasts longer or looks more elegant.
Advantages
- Heat & Scratch Resistant
- Stain Resistant
- Low maintenance
- Extremely hygienic
- Wide selection of styles
- Natural Product
Disadvantages
- Sealing recommended for maintenance each year to prevent potential stains from oil & wine.
- Not a uniform pattern or color. Patterns occur naturally and are considered the beauty of stone.
4. Loading Pre-fabricated Granite Slabs
Loading and Transporting Granite Countertops
Granite is a rigid, natural stone. When properly supported; it is sturdy and will resist cracking. Without proper support, granite is susceptible to cracking and breaking. Like glass, Granite is transported vertically on its edge. If Granite is laid flat, it will likely crack during transport.
To support the transportation of Pre-fabricated Granite, The Granite Store recommends having a professional installer transport your Granite using A-frames support structures (A-frames are typically built with 2” x 4”s at a 10° angle). Securing the Granite against the slope of the “A” provides even support. Horizontal and vertical supports connect the two sides of the A-frames and provide a surface for the clamps and straps (a proper tie-down is highly recommended) that will hold the Granite in place.
Due to liability concerns, The Granite Store can ONLY assist in placing the Granite in the bed of a truck. Securing the Granite for transportation will be the responsibility of the customer (installer, handyman, or contractor). If you’re transporting the Granite yourself, make sure you bring a friend for assistance to tie, strap, and carry the Granite.
It is the customer’s responsibility to inspect each piece of Granite to make sure they are in good condition and are properly & safely secured prior to leaving The Granite Store. The Granite Store cannot be liable or responsible for any damage occurring after the product has left our location.
5. Installing Pre-fabricated Granite Countertops
The Granite Store recommends using a professional installer for the installation of all pre-fabricated Granite. Not only does this allow for ease of transportation but will additionally provide a professional installation with an exact fit, nearly invisible seams and uniform polished edges. As a courtesy to our customers, we provide the following informational DIY guide to countertop installation and is meant as reference only.
Step 1: Order Pre-fabricated Granite Countertops
After cabinets are installed, measure for the granite countertops. Measurements must be very precise.
The granite system requires a sheet of ¾” plywood be laid on top of the cabinets to support the granite.
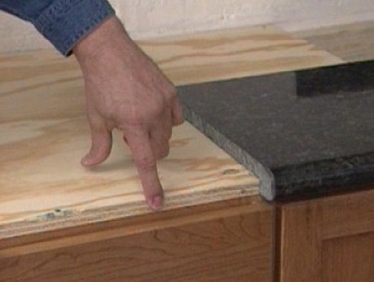
Be sure to note which edges of the counter should have a bull-nose finished edge.
Determine the width of the Pre-fabricated granite countertop you will require for the application; 26” standard, or 36”, 42” & 52” peninsulas. Also determine what length slabs will be required (Typically 8’, 10’ or 12’)
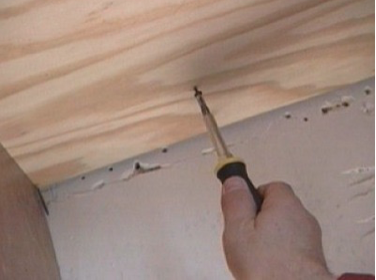
Step 2: Prep the Cabinets to Receive the Granite Countertop
Cut the 3/4″ plywood to fit on top of all the base cabinets. The plywood supports the Granite and gives enough clearance for the bull-nose edging to clear the drawers and doors.
Make sure the plywood does not overhang the outside dimension of the cabinet.
To attach the plywood to the frame of the cabinets with screws, first drill a pilot hole to keep from splitting the hardwood face frame. Make sure to center the screws into the frames underneath.
Step 3: Prepare to Install the Pre-fabricated Granite Countertops
You’ll need help working with Granite. Some of the pieces can weigh more than 200 pounds. Granite can also be brittle, so handle them with utmost care.
Be sure to have space set aside to store the Granite before installation. It’s best to store them as upright as possible, be careful to not let them “domino” and break.
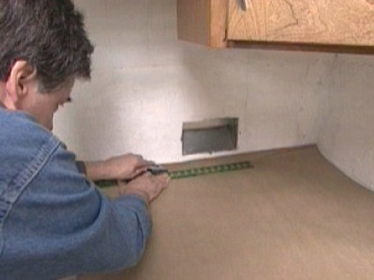
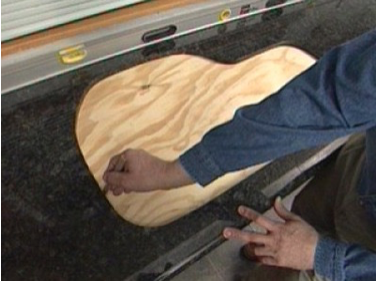
Your walls may not be perfectly square, so it’s a great idea to create a template for the Granite countertops. Use craft paper (or cardboard) to make a template of the actual measurement of the countertop. (A template is easier to move around than making marks on the Granite.)
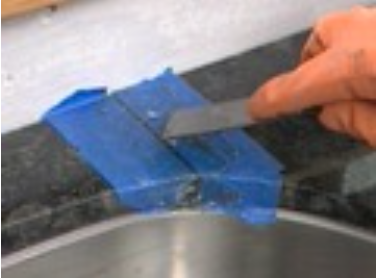
If you need to scribe a piece to fit, apply masking tape to the base of the Granite to protect the piece and allow for a cleaner cut.
Use a circular saw with a dry-cut segmented diamond blade.
Test fit pieces that are cut, and be careful with long, thin pieces that could snap.
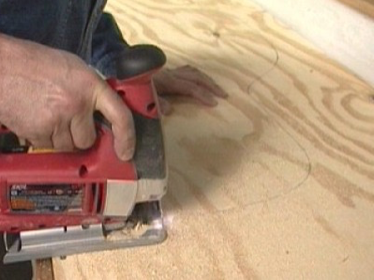
Step 4: Cut the Plywood Sink / Cook top Hole
Set the Granite in place for the sink and trace the exact line around the opening for the sink onto the plywood sub counter.
Remove the Granite that was dry-fitted.
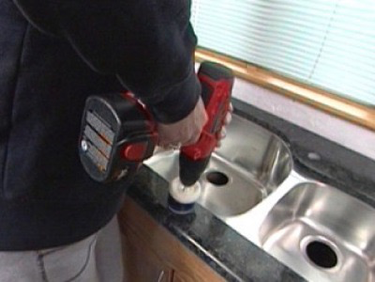
Use a spade bit to make a pilot hole in the plywood, and use a jigsaw to cut the sink hole. Make it about 1/8″ larger than the line you drew.
Drop in the sink.
Before you lay the Granite back on top, lay down some cardboard to protect the sink. You’ll remove the cardboard before joining the Granite seams.
Step 5: Join the Granite Seams
Level the seams for the pieces.
Use 1-1/4″ screws to adjust the height of the slab from underneath to raise and lower the countertop.
Use a level to fine tune as tips of screws push from the underside of the Granite.
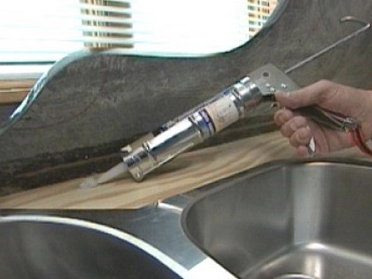
Step 6: Glue Granite Countertops Down
With the help of others, lift the Granite and put half-dollar dollops of silicone around the perimeter of the cabinets (space about every 6″ to 12″).
Place a bead of caulk around the sink rim.
Apply second bead on top of sink rim to waterproof the gap between the sink and the countertop.
Lower the Granite gently back down.
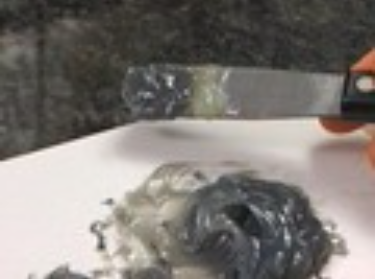
Step 7: Glue the Seams
Tape over the seam with masking tape.
Next, to fill in the seams you’ll start with a dollop of polyester-based resin and add a small amount of color, trying to match the color of the granite.
Mix with a putty knife.
Keep checking color against the stone.
Create a few different colors to blend into the seam.
Add the hardener (3 percent hardener to 97 percent resin), and mix only a workable amount as you only have about five minutes to apply.
Apply a base-coat of neutral color mix into seam.
Dab in and smooth as you go.
Apply a little lighter color here and there.
Apply the darkest color last.
As soon as you’re done, pull off the masking tape so it doesn’t dry on the tape.
After it has dried about 30 minutes, smooth it out with a seam stone.
Use slow speed, and firm pressure.
Keep the stone moving in small circles, you’ll feel when it’s smooth.


6. Granite Care
Granite Care
- Clean surfaces with neutral, mild household cleaners, few drops of dishwashing detergent or Murphy’s Oil Soap©” and warm water or use natural stone care products.
- Too much cleaner or soap may leave a film and cause streaks. If this happens, clean up excess soapy film with clear, warm water and a clean sponge or rag.
- Dry the surface after cleaning with a soft cloth.
- Clean spills immediately.
- Don’t use bleach, vinegar, lemon juice or other cleaners containing acids or ammonia such as Windex. The high acid content can dull the finish.
- Do not use abrasive scouring powders or liquids. These products contain abrasive chemicals or ammonia that may damage the surface. If required, use a non-abrasive cleaning product and a Scotch-Brite® Blue “no-scratch” pad. Do not hesitate to apply hand-pressure needed to rub out any marks.
- Adhered materials like chewing gum, food, nail polish, or paint can be scraped away with a plastic putty knife. Rinse the surface with clean water to remove residue.
- Avoid contact with harsh chemicals such as: bleach, paint strippers, oven cleaners, or drain cleaners.
Granite Preservation
- Preserving your natural stone is simple. Apply topical sealant or coating every year. It will also enhance the surface sheen.
- Sealing the surface of the stone creates a moisture barrier. It eliminates moisture penetration, slows down or eliminates staining.
- If there are any pores on the surface of the stone, apply a penetrating sealer. One-step formula designed to deeply penetrate the pores of the surface creates a superior stain protection barrier. It will enhance the appearance and it will last for many years.